Tutorial - Install MySQL server on Raspberry Pi
Learn how to install MySQL server on a Raspberry Pi to ultimately run WordPress from it.


In this tutorial, I'm going to go through the steps to install MySQL on Raspberry Pi. This is part 2 in a 3 part tutorial which will ultimately see WordPress running from Nginx on your Raspberry Pi.
Prerequisites
I'm assuming that you know your way round command line interface and are comfortable using it. I'm also assuming that you've followed the previous tutorial on how to install Nginx and PHP on Raspberry Pi.
Step 1 – Important, check your firmware
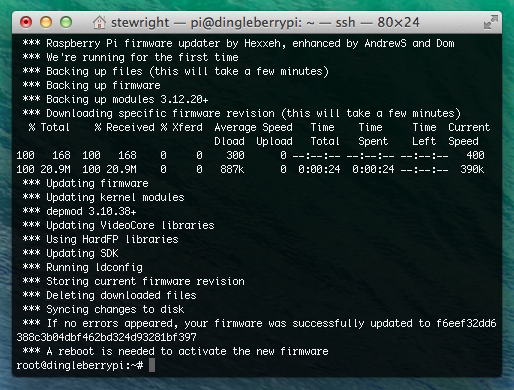
Before we begin, there is a bug either in Raspbian or in the Firmware which prevents a successful install of MySQL Server on Raspbian. Type the following command to find which version of the firmware you have installed:
sudo uname -a
If your firmare reads this:
Linux raspberrypi 3.12.20+ #687 PREEMPT Fri May 30 16:39:11 BST 2014 armv6l GNU/Linux
Then we will need to roll it back to the April firmware in order to prevent the install from failing. Type this command:
sudo rpi-update f6eef32dd6388c3b04dbf462bd324d93281bf397
If your firmware does not appear to be Friday May 30, skip to step 2. The Firmware update utility will begin running. Important, make sure you have backed up everything just in case the firmware fails to update. The process takes approximately 5 minutes, after which you will see the following message:
When the reboot message is displayed, go ahead and reboot your Raspberry Pi by typing:
sudo reboot
It may take a bit longer than usual to start back up, but yet again just let it do it's thing and you should be back up and running.
Step 2 – Install MySQL on Raspberry Pi
Now we're ready to start the installation. First we need to ensure everything's up-to-date:
sudo apt-get update && sudo apt-get upgrade
Install any out of date packages when prompted. Next we're going to install the actual MySQL server by typing:
sudo apt-get install mysql-server --fix-missing
I tend to use the –fix-missing flag when installing mysql-server as in the past I've found some packages were missing. You should be prompted for a root password:
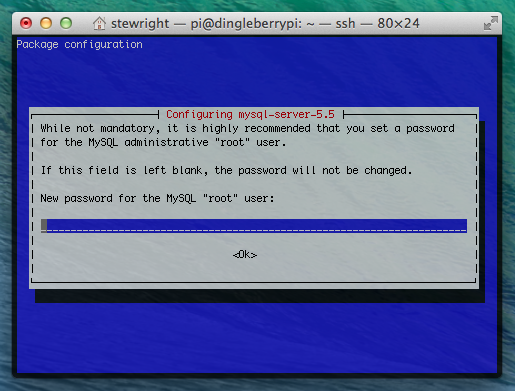
Choose a secure password, and keep it safe. You will need this later to create additional users for WordPress. You will be prompted to confirm your password:
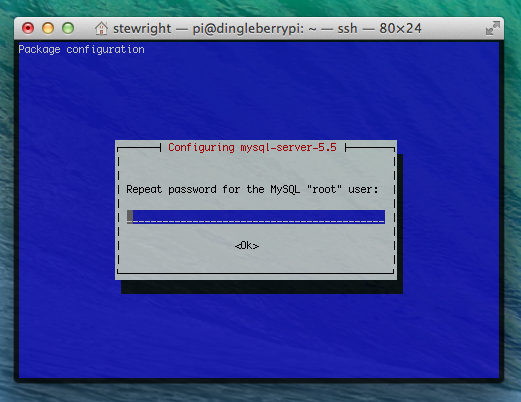
Once you've confirmed your password, MySQL server should finish installing and the service should start.
Now we need to install a couple of extra packages, php5-mysql and mysql-client. The php5-mysql package allows connections to be made to MySQL Server through PHP, and mysql-client allows us to connect to our local MySQL server through the CLI:
sudo apt-get install mysql-client php5-mysql
That's it. Now all we need to do is create an additional user and create our database, ready for when we install WordPress.
Step 3 – Create a Database and a MySQL user for WordPress
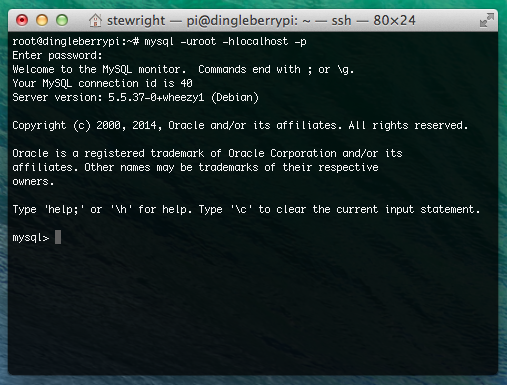
We need to connect to our local MySQL instance and create a user and a database. Type the following command:
mysql -uroot -hlocalhost -p
You will be prompted for the root password. Go ahead and type the password that you gave for the root user in step 2. You should now see something that looks like this:
I'm going to call my database wpdb, but you can call yours whatever you want. Just substitute wpdb with the name of your choice:
CREATE DATABASE wpdb;
This will create the database. With MySQL, ensure you end each command with a semicolon. I'm going to call my database user wpuser but yet again, call yours anything you like. Also choose a strong password and substitute password_here with the password of your choice for the new user:
CREATE USER 'wpuser'@'localhost' IDENTIFIED BY 'password_here';
This creates the user that our WordPress installation will use to connect to its database. We've created the user with the host localhost as we will only be connecting to MySQL server on the local machine (the Raspberry Pi). Now we need to give the user wpuser access rights to the database wpdb. Type the following:
GRANT ALL PRIVILEGES ON **wpdb.*** TO '**wpuser**'@'localhost';
Finally, flush the privileges for the changes to take effect:
FLUSH PRIVILEGES;
We'll quickly test this to ensure we can login using our newly created user on our new database. Press CTRL + C to exit MySQL Client. Login using your new credentials:
mysql -uwpuser -hlocalhost wpdb -p
When prompted, type the password that you assigned to your new user. You should be logged into the server using these new credentials.
Conclusion
So, let's recap what we've done so far. We've rolled back our firmware if required, we've installed MySQL Server, MySQL client and the package to allow WordPress to connect to our local database, and finally created a new user and database ready for WordPress.
In our final tutorial in this series, we concentrate on installing and configuring WordPress on our Nginx web server. Keep your eyes peeled for the tutorial. Any comments or questions, sound them below.