Boost Raspberry Pi performance by installing Raspbian on a USB Flash drive from Windows
Learn how to boost the performance of your Raspberry Pi by running Raspberry Pi OS from a USB flash drive

By default, Raspbian runs from a MicroSD card on your Raspberry Pi. Micro SD card performance in terms of speed and reliability tends to be considerably less than with USB Flash storage. This tutorial will guide you through the process of installing Raspbian on a USB Flash drive from Microsoft Windows. Once you’re done, your Raspberry Pi’s performance will increase considerably.
Running Linux or MacOS?
I’ve previously written tutorials on how to achieve this from MacOS or Linux. Follow the tutorial here.
Let’s get started – what you need
You will need the following to get started:
- A Raspberry Pi 2, 3 or 3
- A USB Flash drive with at least 4GB capacity (I recommend Corsair Voyager or Sandisk Cruzer with 8GB+)
- A 4GB Micro SD card (Yep, I’m afraid you will still need one of these to begin with)
- A PC running Windows 7, 8 or 10
Step 1 – Download Raspbian and Etcher
To begin, we will need to download Raspbian OS. There’s two different flavours; Raspbian Lite – purely command line (for servers and running services) and Raspbian Desktop, which has a full desktop enviroment. Choose the one which best suits your needs.
- Download Raspbian from Raspberry Pi
- Download Etcher
Step 2 – Install Raspbian to the MicroSD card
Note: If you’re using a Raspberry Pi 3+, you don’t need to do step 2. Jump straight to step 3. Unfortunately, we still need a MicroSD card. We will do the first boot off the MicroSD card, and then configure the Raspberry Pi to boot from the USB Flash Drive.This is because the hardware does not support USB booting, so the SD card will eventually tell the Raspberry Pi to continue to boot from the USB Flash drive.
Go ahead and install etcher on your PC. Once installed, open Etcher, select the downloaded file (no need to unzip) for Raspbian, choose your MicroSD card and finally click ‘Flash!’.
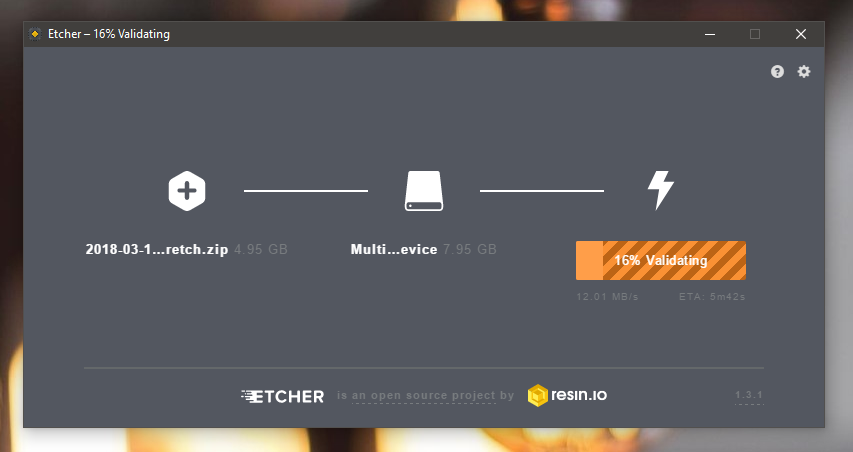
Once finished, allow the validation to finish and remove once complete.
Step 3 – Install Raspbian to the USB Flash Drive
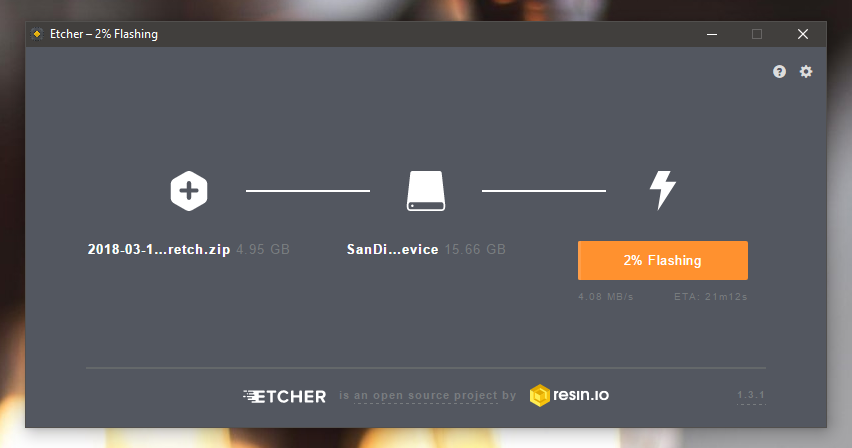
The process is exactly the same as step 2, but this time we choose the USB flash drive as our destination. Choose the Raspbian zip as the source, the USB Flash as the destination and click ‘Flash’. If you’re using a Raspberry Pi 3 Model B+, you can skip step 4.
Step 4 – Prepare the Raspberry Pi for boot from USB
If you’re using a Raspberry Pi 3 Model B+, you can skip straight to step 5.
Remove the MicroSD card from your computer and insert it into your Raspberry Pi and start it up. Once you’ve booted, you will want to launch Terminal (if you opted for the desktop version of Raspbian). Next, type the following command:
sudo nano /boot/config.txt
Add this line to the bottom of the file:
program_usb_boot_mode=1
Press keys CTRL + X to exit nano, saving when prompted. Now, you’re ready to boot from the USB.
Step 5 – Boot Raspbian from USB Flash Drive
Insert the USB Flash drive into a USB port on your Raspberry Pi. If you’re not using a Raspberry Pi 3 Model B+, keep the MicroSD card inserted. Power on the Raspberry Pi and it will now boot from the USB Flash drive.
Conclusion
By booting Raspbian from USB Flash Drive on our Raspberry Pi, we are improving the speed and reliability significantly when using a high quality USB Flash Drive. I strongly recommend Corsair Voyager USB flash drives, from personal experience they offer the quickest read/write speeds of the ones I’ve tested. Any feedback, feel free to ask a question below.