Brightness flickering on your Surface Laptop or Surface Pro? Here's a fix
Learn how to prevent brightness flickering on your Microsoft Surface Pro or Surface Laptop.

I recently made the switch from using Macs for 20 years to having my first Windows laptop, a Microsoft Surface Laptop. All’s been well, apart from irritating brightness flickering when the screen is dimmed. I feared at first that it may be a hardware issue, turned out it was fairly straight forward to fix.
Flickering brightness on Surface – The issue
I found the most affective way to replicate was to:
- Dim my display to around 50%, then open the Netflix App (or something dark) and your browser of choice.
- In your browser go to Google, or some other predominently white page.
- ALT + TAB and switch between them, allowing around 3-5 seconds between switching between these dark and light applications.
During this 3-5 second switch period, you’ll notice a ‘brightness ficker’. Irritating, right? It’s probably worth pointing out that disabling automatic dimming in systems does not fix this.
The cause of the Surface brightness flicker
This isn’t a hardware issue (as I initially suspected) you’ll be relieved to hear, but a ‘feature’ of the Intel Graphics chipset. Intel DPST, or ‘Display Power Saving Technology‘, is a power-saving technology that adjusts the brightness dependent on what’s on screen. Although well intended, this feature is pretty crap, as it doesn’t do it in isolation nor is it quick enough to react.
The fix for flickering brightness on Surface devices
You can do one of two things here:
- Download Intel drivers and disable through the control panel (not what I did) or
- Change a key in the registry to disable Intel DPST. I’ll talk you though this method
Step 1 – Launch the Registry Editor
Open the Start menu and type ‘regedit’. Once you’ve done this, right click it and choose ‘Run as Administrator’. You should now see the Registry Editor, a fairly intimidating piece of software. It’s fair to say at this point, if you’re not confident with regedit, don’t continue.

Step 2 – Locate the entry which controls Intel DPST
Navigate to the following key:
HKEY_LOCAL_MACHINE\SYSTEM\ControlSet001\Control\Class\{4d36e968-e325-11ce-bfc1-08002be10318}\0001
In there you should see ‘FeatureTestControl’. Right click and choose ‘Modify’. If you don’t see this item in ‘0001’, look in ‘0000’ instead.
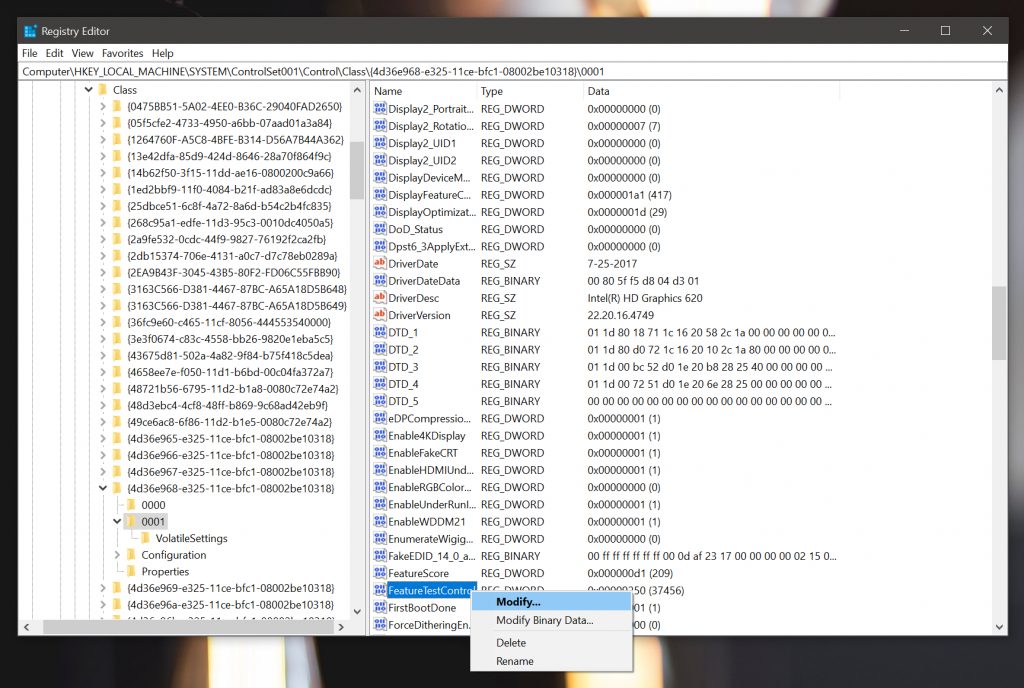
Step 3 – Modify FeatureTestControl and restart
You should see a value of ‘9240’. Change this to 9250 and click OK. Restart your Surface device and hey presto! Job done.
Conclusion
The Surface line are brilliant devices, but I feel this is a big oversight on Microsoft’s part. Hopefully, they’ll put in a fix in future releases. If an update reverts the key change, just redo this tutorial again. Any thoughts or questions, sound off in the comments.